With best natural looking foundation at the forefront, this comprehensive guide delves into the world of cosmetics, unveiling the secrets to achieving a flawless, radiant complexion. From understanding skintone and undertones to mastering the art of foundation application, this article will walk you through the process of finding the perfect natural-looking foundation for your skin type.
The quest for a natural-looking foundation is a never-ending journey, marked by trial and error, experimentation, and patience. But what exactly makes a foundation “natural” looking? Is it the subtle sheen, the flawless finish, or the perfect color match? In this article, we will explore these questions and more, providing you with a comprehensive guide to discovering your ideal natural-looking foundation.
Characteristics of Best Natural Looking Foundation
The best natural looking foundation is characterized by its ability to blend seamlessly into your skin, providing a flawless and radiant finish that enhances your natural complexion without looking too made-up. A high-quality foundation can make all the difference in how you feel about your skin, giving you confidence and a radiant glow.
Key Ingredients for a Natural Finish
Some of the key ingredients that provide a natural finish in foundations include:
- Hyaluronic Acid: This ingredient helps to retain moisture in the skin, leaving it feeling soft and supple, and giving it a healthy, natural glow. By hydrating the skin, hyaluronic acid helps to create a smooth canvas for foundation to adhere to, ensuring a seamless finish.
- Green Tea Extract: Green tea is rich in antioxidants that help to soothe and calm the skin, reducing inflammation and redness. This makes it an excellent ingredient for sensitive skin, and helps to create a natural-looking finish that is free from visible pores and imperfections.
- Jojoba Oil: Jojoba oil is a lightweight, non-greasy oil that helps to nourish and moisturize the skin, leaving it feeling soft and smooth. This makes it an excellent ingredient for foundation, as it creates a smooth, even finish that lasts all day.
Role of Undertones
Undertones play a crucial role in determining the natural look of your foundation. If you have a cool undertone, you will look best in pink-based foundations, while warm undertones suit yellow-based foundations. Neutral undertones, on the other hand, can pull off a wide range of foundation shades.
Foundation Finishes
Different foundation finishes can greatly affect the natural look of your foundation. Here are a few common finishes, and how they can impact the appearance of your complexion:
“A foundation with a matte finish can help to control oil and shine, creating a smooth, even surface for application. On the other hand, a dewy finish can add a touch of radiant glow to the skin, while a satin finish can help to blur out fine lines and wrinkles.”
| Finish | Description |
|---|---|
| Matte | Creates a smooth, flat finish that controls oil and shine. |
| Satin | Offers a smooth, even finish that blurs out fine lines and wrinkles. |
| Dewy | Creates a radiant, glowing finish that enhances the natural sheen of the skin. |
Pigmentation and Color Matching
Pigmentation and color matching are crucial when it comes to finding the perfect foundation. When choosing a foundation, it’s essential to select a shade that complements your natural skin tone, rather than trying to completely cover it up.
“The best way to match your foundation to your skin tone is to test out a variety of shades using a swatch or a makeup brush. Look for a shade that blends seamlessly into your skin, rather than one that stands out or looks artificial.”
Understanding Skintone and Undertones

When it comes to finding the perfect natural-looking foundation, understanding your skintone and undertones is essential. The wrong foundation shade can leave you looking unnatural, washed out, or even sickly. On the other hand, a well-matched foundation can enhance your features, create a radiant complexion, and make you feel confident and beautiful.
So, how do you determine your skintone and undertones? It’s actually quite simple. Start by examining the color of the veins on the inside of your wrist in natural light. If your veins appear blue or purplish, you have a cool skintone. If they appear green, you have a neutral skintone. And if they appear yellow or golden, you have a warm skintone.
Your undertones can affect the way foundation looks on your skin. For example, if you have cool undertones, you may look best in blue-based or pink undertones. If you have warm undertones, you may look better in yellow-based or golden undertones. And if you have neutral undertones, you may be able to pull off a wide range of undertones.
Here’s a table comparing and contrasting different skintones and undertones:
| Skin Tone | Warm Undertones | Neutral Undertones | Cool Undertones |
|---|---|---|---|
| Cool | No | Maybe | |
| Neutral | Moderately Warm | Neutral | Moderately Cool |
| Warm | Maybe | No |
Understanding your skintone and undertones can help you find a foundation that complements your skin and creates a natural-looking finish. So take the time to determine your skintone and undertones, and you’ll be on your way to glowing, radiant skin.
Foundation Types for Natural Look
When it comes to achieving a natural-looking foundation, the type of foundation you choose plays a crucial role. Different foundation types offer unique benefits and drawbacks, making it essential to understand your skin type, undertones, and personal preferences before selecting the perfect foundation.
Different Types of Foundations
There are four primary types of foundations: liquid, cream, powder, and stick. Each type has its unique characteristics, advantages, and disadvantages, which we will discuss below.
- Liquid foundations are known for their blendability and versatility. They are often used for achieving a seamless, airbrushed finish. Liquid foundations are perfect for those with normal to oily skin types, as they provide a lightweight, oil-controlling coverage.
- Cream foundations, on the other hand, offer a slightly heavier, more moisturizing coverage. They are excellent for dry or mature skin types, as they provide a comforting, hydrating effect. Cream foundations can sometimes appear cakey or heavy under the eyes, but when applied correctly, they can provide a natural, dewy finish.
- Powder foundations are a popular choice for those who prefer a light to medium coverage. They are often used to set liquid or cream foundations and provide a smooth, matte finish. Powder foundations work well for those with oily skin types, as they absorb excess oil and reduce the appearance of pores.
- Stick foundations are ideal for targeted coverage. They are compact and portable, making them an excellent option for touch-ups throughout the day. Stick foundations are perfect for oily skin types, as they provide a lightweight, oil-controlling coverage in a small, portable format.
The Role of Texture in Achieving a Natural Foundation Feel
The texture of your foundation significantly impacts the overall finish and feel. Thicker, creamier foundations tend to provide a more natural finish, especially when applied with a beauty blender or brushes. On the other hand, liquid foundations with a lighter texture often work better for those who prefer a seamless, airbrushed finish.
Blending and Applying Different Foundation Types
Blending and applying different foundation types requires a bit of practice, but with the right techniques, you can achieve a flawless, natural finish.
- For liquid foundations, use a beauty blender or a damp beauty sponge to blend the foundation into your skin. Focus on the center of your face and work your way outwards, blending the foundation into your hairline, jawline, and edges.
- Cream foundations can be applied with a brush or a beauty blender. Use a gentle, sweeping motion to blend the foundation into your skin, focusing on the areas where you need the most coverage.
- Powder foundations can be applied with a powder brush or a powder puff. Lightly dust the powder over your skin, focusing on the areas where you need a smooth, matte finish.
- Stick foundations can be applied directly to the skin using a gentle, patting motion. Focus on the areas where you need targeted coverage, such as blemishes or dark circles under the eyes.
Application Techniques for Natural Finish
Achieving a flawless, natural-looking foundation finish requires more than just the right product; it demands a thoughtful application technique. A well-executed application process can make all the difference in enhancing your skin’s natural appearance, while a misguided approach can lead to a cakey, artificial look. In this section, we’ll delve into the essential application techniques for a stunning natural finish.
Pre-Application Preparation
Before you even apply your foundation, it’s crucial to prepare your skin for the best results. A thorough skincare routine, including cleansing, exfoliating, and moisturizing, lays the groundwork for a smooth, even canvas. This step is often overlooked, but it’s essential for a natural-looking finish. Ensure your skin is free of any imperfections, such as blemishes or scars, by using a primer or a small amount of concealer.
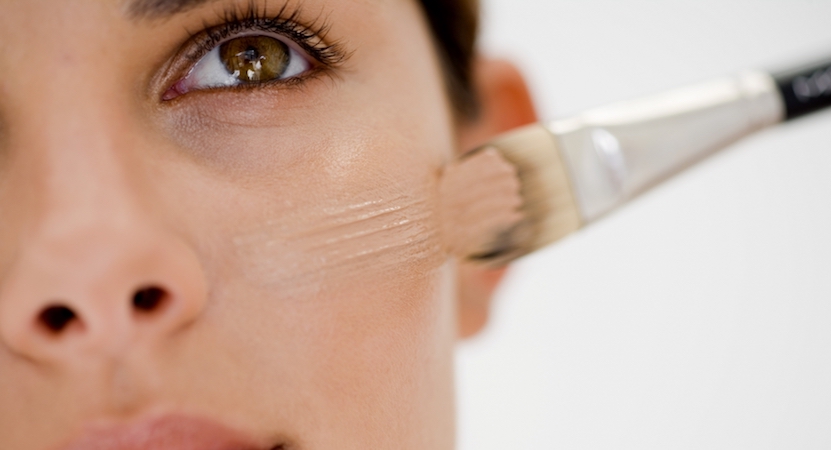
Choosing the Right Tools
The right tool can make all the difference in achieving a natural finish. Here are some of the most commonly used tools for foundation application:
- Brushes: A high-quality foundation brush is essential for a natural look. Look for a brush with soft, synthetic or natural fibers that won’t absorb too much product, leaving you with an uneven finish.
- Sponges: A beauty sponge is perfect for blending foundation, especially around the edges and in hard-to-reach areas. Choose a soft, gentle sponge that won’t leave behind any lines or marks.
- Fingers: Using your fingers to apply foundation can be a great way to achieve a natural finish. Simply dip your fingers into the product and gently pat it onto your skin in a gentle, sweeping motion.
When choosing a tool, consider the type of foundation you’re using. For instance, a brush may be better suited for liquid or cream foundations, while a sponge is ideal for mineral or loose-powder foundations.
Application Techniques
Now that you’ve prepared your skin and chosen your tools, it’s time to apply your foundation. Here are some essential techniques to achieve a natural-looking finish:
- Dot and Blend: Apply small dots of foundation to your face, focusing on areas where you need the most coverage. Blend the product in a gentle, sweeping motion using your brush, sponge, or fingers.
- Feathering: For a seamless finish, use a light touch to feather your foundation outward from the center of your face. This technique helps create a soft, natural-looking edge around your face.
- Building Coverage: For areas that need more coverage, such as blemishes or scars, use a small amount of concealer or foundation to build up coverage gradually. Remember, it’s better to start with a light hand and build up gradually, rather than applying too much product at once.
By mastering these essential application techniques, you’ll be well on your way to achieving a stunning, natural-looking foundation finish that enhances your skin’s natural beauty.
Finishing Touches
To set your foundation and ensure a long-lasting finish, finish with a light dusting of powder. Look for a translucent powder that won’t change the color of your foundation or cake your skin. Using a gentle touch, sweep the powder across your face, focusing on areas where you tend to get oily.
Final Tips, Best natural looking foundation
Achieving a natural-looking finish takes practice, so don’t be discouraged if it takes a few tries to get it right. Here are some final tips to keep in mind:
- Blend, Blend, Blend: The key to a natural finish is blending, blending, blending. Take your time and make sure to blend each area of your face, feathering the product outward from the center.
- Start Light: Remember, it’s better to start with a light hand and build up gradually, rather than applying too much product at once.
- Less is More: When it comes to foundation, less is often more. Focus on enhancing your skin’s natural beauty, rather than hiding behind layers of makeup.
By following these application techniques and final tips, you’ll be well on your way to achieving a stunning, natural-looking foundation finish that will leave you feeling confident and beautiful.
Closing Notes

As you embark on your journey to finding the perfect natural-looking foundation, remember that it’s all about balance, harmony, and a deep understanding of your skin. By understanding your skintone, undertones, and skin concerns, you’ll be able to make informed decisions about your foundation choices. With the right tools, techniques, and products, you’ll be on your way to achieving a natural-looking foundation that accentuates your features, enhances your complexion, and leaves you feeling confident and radiant.
Q&A
Q: What is the best foundation finish for a natural look?
A: The best foundation finish for a natural look is often debated, but most experts agree that a satin or dewy finish provides a natural, radiant complexion.
Q: How do I determine my skintone and undertones?
A: To determine your skintone and undertones, consider the color of your wrist veins, the natural color of your hair, and the color of your skin in natural light. You can also consult with a makeup artist or skincare professional for personalized advice.
Q: What are the most common skin concerns that affect foundation application?
A: The most common skin concerns that affect foundation application are acne, aging, and hyperpigmentation. When selecting a foundation, look for products that address these concerns and offer suitable coverage.

